

Construction & Management of Solar Kilns
A beauty of solar kilns is that they are very inexpensive to build and require very little management or control; air drying first is highly recommended

Several years ago we built two kilns to the Virginia Tech design, to accommodate 750-1000 board feet of lumber; in the real world I am usually at the low end of that range, because I am not drying of full load of 12 foot long lumber (12 feet is the max for the kiln design we constructed.)
A couple of other things I have learned:
Generally, almost always, I air dry the lumber first, which in southwest Michigan means that the lumber is at about 15% moisture content before it goes into the solar kiln. Drying green lumber takes a least four times as long; I can get a load of air dried lumber to kiln dried in a week, while drying green lumber can take four to six weeks, or more. Also, air drying the lumber first prevents kiln-generated defects in the lumber.
Once the lumber dries below 22 percent moisture, the risk of creating new cracks and splits is low.
Design and Operation of a Solar-Heated Dry Kiln, Virginia Tech
In the literature it states that if you are drying less lumber than the kiln is designed for, say 500 board feet instead of a 1,000, you should cover a portion of the glazing to prevent overheating, say 50% coverage in the case described; I have never done this, and I have never seen a kiln temperature more that 50 degrees Fahrenheit above ambient. So, if it is 90 degrees ambient, which is hot in the lake-effect zone of southwest Michigan, I might see 140 degrees F in kiln.
Thickness of the lumber is also a limitation; I have never dried lumber more than two inches thick.
Build of the Solar Kilns
We built the first using store-bought lumber for the structure, but we milled the board & batten siding. For Solar Kiln #2, except for the floor framing, which is pressure treated, we milled all the lumber on-site.


Kenton (pictured in the above gallery) and I built the kilns; it’s very manageable, and was only my second construction project, the first being a chicken coop. The point being, you too can do it. Just below is a video of the “grand opening” walk-around of the Solar Kiln.
Then, a brief view of what the Solar Kiln looks like just before the doors are closed.
With respect to the design, build, and operation of the Solar Kiln, I have included below the PDFs from Virginia Tech:
Once the doors are closed on the load, I don’t touch the lumber until it is kiln dry and ready for transport to the customer.
One key feature of the Solar Kilns is the solar fans. We used the ECO-WORTHY 25W Solar Powered Attic Ventilator Gable Roof Vent Fan with 30W Foldable Panel. There are no batteries involved; when the sun comes up the fans turn, when the sun is down the fans stop, which is exactly what the kiln drying process calls for. Again, no management of the fans is required.
The temperature inside the kiln will increase during the day until it peaks at mid afternoon and then cools at night. At night, as the air in the kiln cools, the relative humidity will increase significantly. The increase in humidity at night is beneficial in reducing or relieving the drying stresses that developed during the day. The result of drying during the day and increasing humidity at night helps minimize drying stress. Fans should be turned off at night for the same reason.
Design and Operation of a Solar-Heated Dry Kiln, Virginia Tech
Management and Control of the Solar Kiln
As said at outset, management of the solar kiln is effectively non-existent; aside from collecting data periodically, the solar kilns are out of sight, out of mind. I exert no control over the process, once the lumber is in the solar kiln. The only questions are, what is the moisture content of the wood, and has it dropped to between 6 and 8%, the working definition of kiln dried; in other words, when can I take the lumber out of the kiln?
So, how is that possible? In the “walkaround” video above, was shown the data logging device we use.
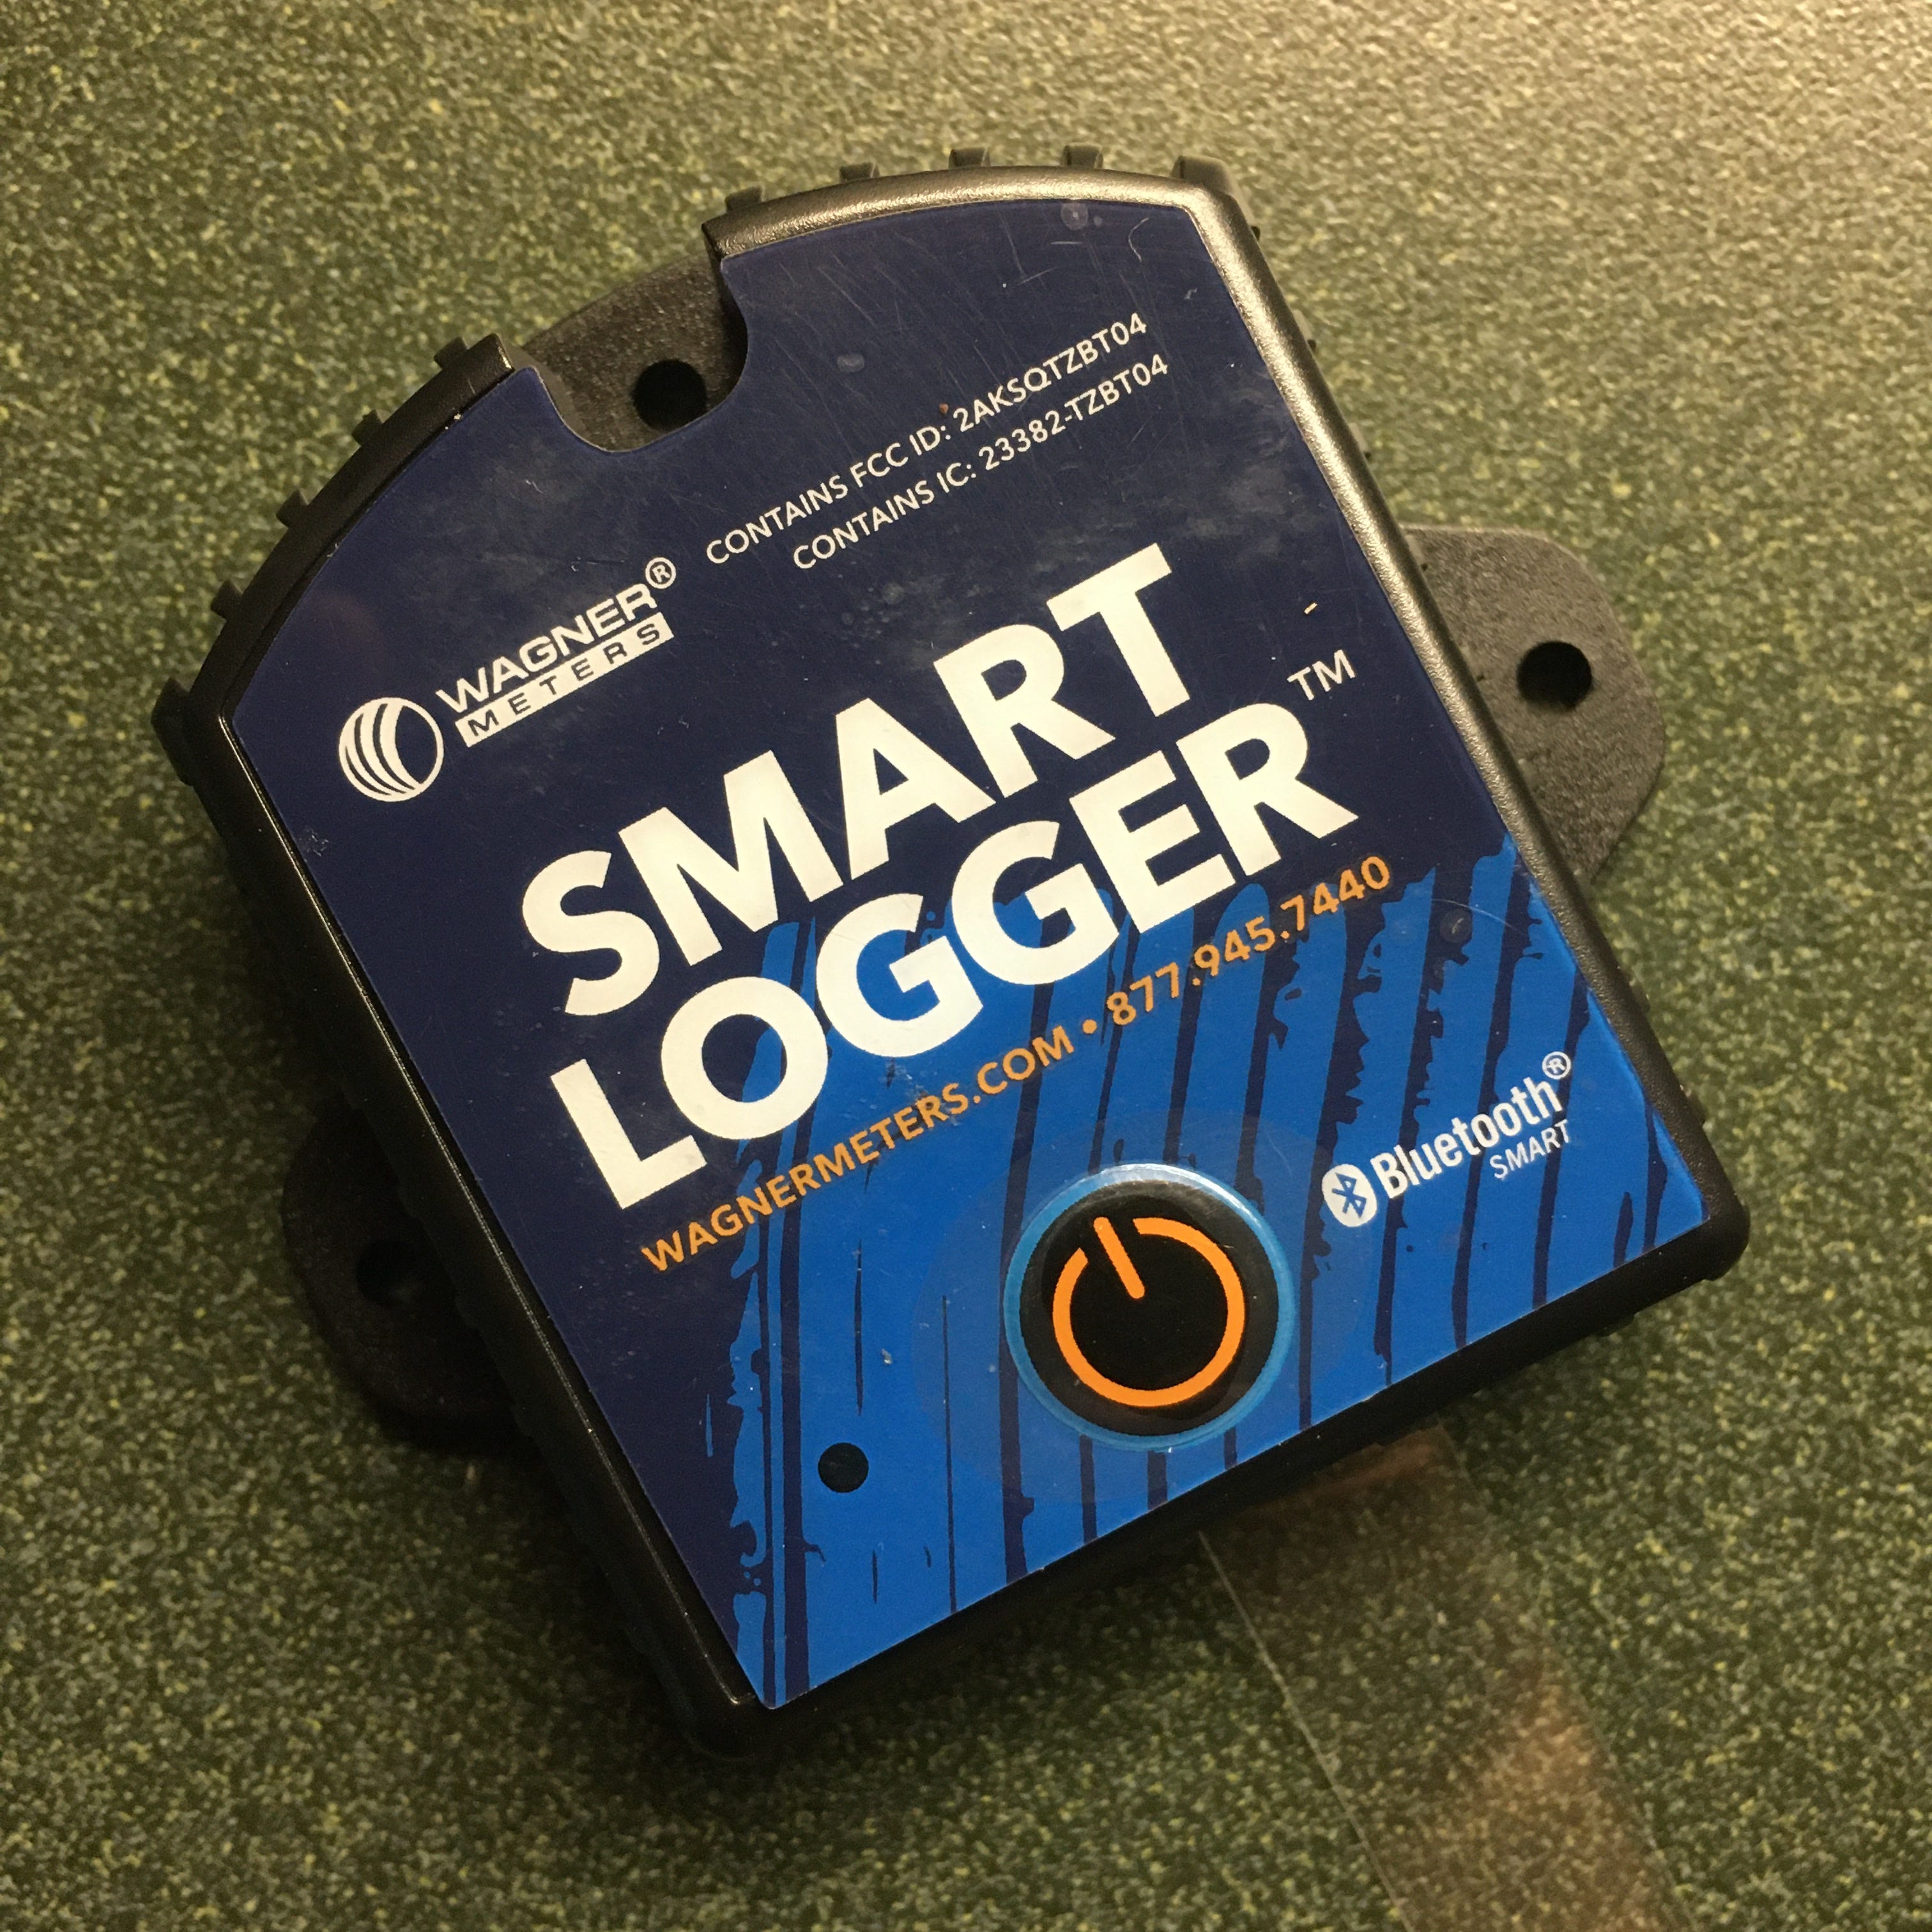
One meter is placed outside, on the north (shady) side of Solar Kiln #1; this meter records the ambient temperature and relative humidity. A meter is then place inside each of the Solar Kilns, on the inside of the door, near the floor; these meters record the temperature and relative humidity inside each kiln, and the data can be bluetoothed to a smart phone or tablet.
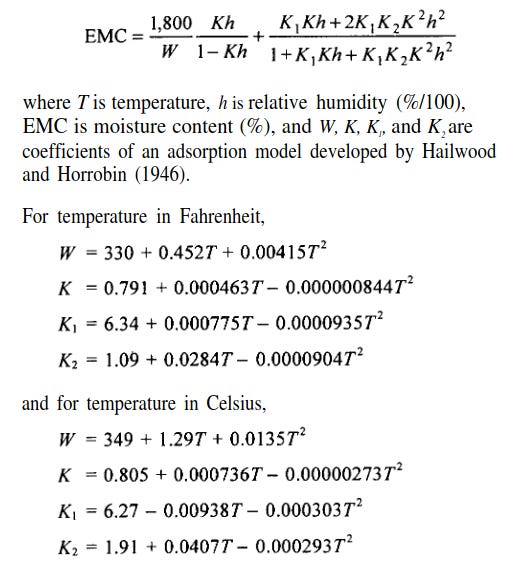
The secret to monitoring the process, without monitoring the wood itself, is to monitor the environment inside the kilns. Because, the temperature and relative humidity in the kiln, is all you need to know to calculate the Equilibrium Moisture Content (EMC). The EMC over time is a close estimate of the moisture content (MC) of the wood. The equation is as follows:
Simple. Some would say, but easier said than done! I developed a spreadsheet, such that all I have to do is to periodically copy and paste the data downloaded from the three Smart Loggers into the spreadsheet.
The first three columns, A, B, and C, are the data from the Solar Kiln #1 Smart Logger, recorded hourly. The tabs at the bottle are for Kiln #1, Kiln #2 and the Ambient Temperature and Relative Humidity. Let’s zoom in on the chart for Solar Kiln #1:
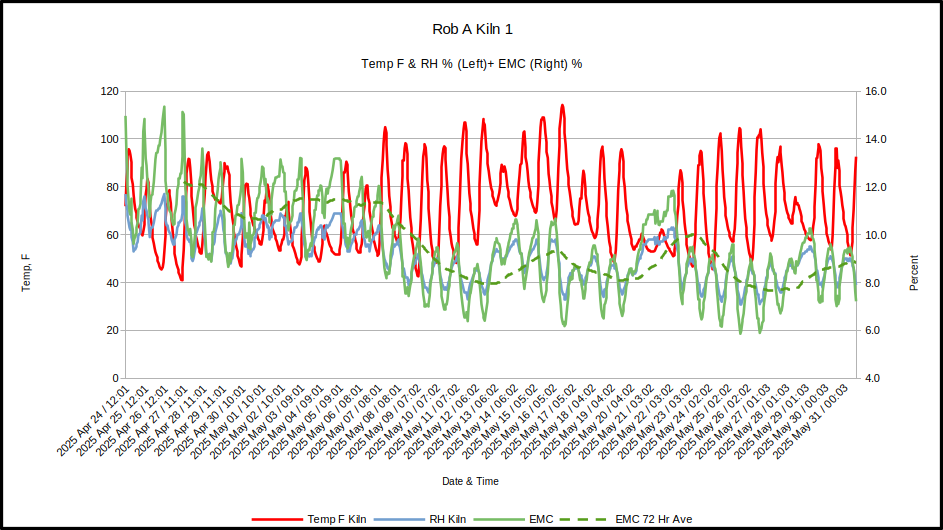
The key series in the chart above is the EMC 72 Hr Average; that is the average EMC for the past three days. When the EMC 72 Hr Average is between 6 and 8%, the lumber can be removed from the kiln. Done and dusted, as I am fond of saying.
The process for calculating the EMC is included in “Equilibrium moisture content of wood in outdoor locations in the United States and worldwide,” from the U.S. Forest Service; a PDF of that document is attached below.
Air Drying Lumber
And finally, let’s talk about air drying. Well, maybe not. It’s not rocket science, and the Forest Service has done the work; attached below is their report on the subject. The basics are simple:
4x4s four feet long, spaced evenly at 18 to 24 inches apart, spanning the length of the lumber
“Stickers,” I often recommend furring strips from the Big Box hardware stores; cut them in half (to four feet in length); you will need as many stickers as you have 4x4s in the foundation, for every layer of lumber.
The surface the foundation needs to be flat to within an eighth inch or so. The lumber will take the shape of the foundation, so some attention to detail in this aspect is important.
But as a picture is worth a thousand words, I will provide one of the best stacks I have seen built, this by Larry in Flint, Michigan, on a recent milling job; it is a thing of beauty.

Approximately 40 layers, at 32 square feet per layer, 4/4 boards with some air gaps between boards; the estimate in the logs of ~1,080 board feet is probably about right. Five stickers per layer, times forty, yields 200 stickers, or 100 furring strips eight feet long.
Attached is what you might call the bible of Air Drying, courtesy of your tax dollars and the Forest Service; the whole of the publication is good information, but pay particular attention to Chapter 5 Piling Methods For Air Drying.
I hope this helps in your understanding of the Air and Solar Kiln Drying processes.
Jabo, great detail and information, but truly sometimes the math part gives me headaches! lol. Keep up the work, someone has to do it.